
Once the data has been saved on the USB device it is now ready to connect to your SkyView device. The steps are as follows:
- Power down the SkyView device if already running.
- Plug the USB drive into the device. If you don’t have USB access to the device via the panel you’ll need to plug the USB into one of the USB ports in the back of the device.
- Power-Up the device.
The device will go through its initial power-up checks before displaying the default screen configuration. Once the power-up sequence has completed and the default screen is displayed you will need to put the device into Set-Up mode. To enter Set-Up mode, press and hold the two right-most buttons on the SkyView front panel until the Set-Up menu is displayed (Figure 1).
 Figure 1 - Front panel buttons to press and hold to enter set-up.
The initial setup menu will be the compact format. You will need to display the full screen version to complete the installation. To enter full screen mode, scroll down to the ENTER FULL SCREEN SETUP MENU option and select – pull right on dial (Figure 2).
 Figure 2 - Full screen Set-Up menu and options
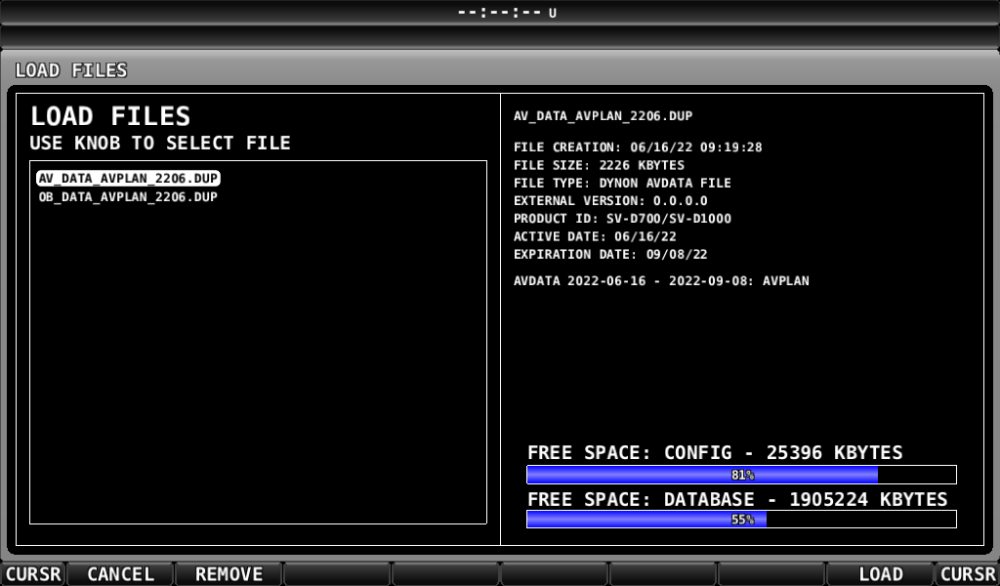
Will the full screen Set-Up menu displayed select the SYSTEM SOFTWARE option to access the SYSTEM SOFTWARE menu options (Figure 3). Next select the LOAD FILES option to display the LOAD FILES menu options and the list of files loaded on the attached USB device (Figure 4).
 Figure 3 - SYSTEM SOFTWARE menu and options
The SkyView will only display files that conform to Dynon’s proprietary specification. Therefore the file list will only contain SkyView files newly or previously downloaded to the inserted USB device. The naming convention for the files is detailed in the following table:
| Data Type | Filename Template |
| AVDATA | av_data_AVPLAN_[ cycle ].dup |
| Obstacle | ob_data_AVPLAN_[ cycle ].dup |
As the files are produced in accordance with the AIRAC data cycle, the [cycle] component of the respective template will be replaced with the cycle number for the given data. For example, for the 2206 data cycle the AVDATA filename will be: av_data_AVPLAN_2206.dup.
The databases are loaded one by one, but in no particular order. To load a database, scroll down to the database file using the right or left-hand knobs on the SkyView panel and once highlighted, select the database by pulling right on the knob. The SkyView will then prompt you to confirm the database load (Figure 5). To confirm the database load press the panel YES button on the bottom right of the panel else to go back to the LOAD FILES menu press the panel NO button in the bottom left of the panel.
 Figure 5 - LOAD FILES database load confirmation prompt
The SkyView will display a progress indicator while the database is loading. At completion of the load process the SkyView will return to the LOAD FILES menu (Figure 4).
At this point the USB can be removed from the SkyView. Unlike the AvPLan EFB SkyView maps and charts the AVDATA and Obstacle data is loaded onto the SkyView’s own resident memory, so the USB does not need to remain in the device.